Redirecting visitors from one page to another on your site is an important part of maintaining your site and there can be a number of reasons for this. Explore them all and learn how to create redirects on your WordPress site.
At some point in the life of your WordPress site, you will need to set up redirects so that you can send visitors from one place to another. For this reason, it is important to understand what redirects are, what you can use them for, and how to configure them on your website.
In this post, we’ll cover all of these topics and show you how to create your first redirect using your own code or using a free WordPress plugin.
This is an essential tool to have in your WordPress toolbox. So if you’re unfamiliar with redirects, read on to learn everything you need to know.
What Is a URL Redirect?
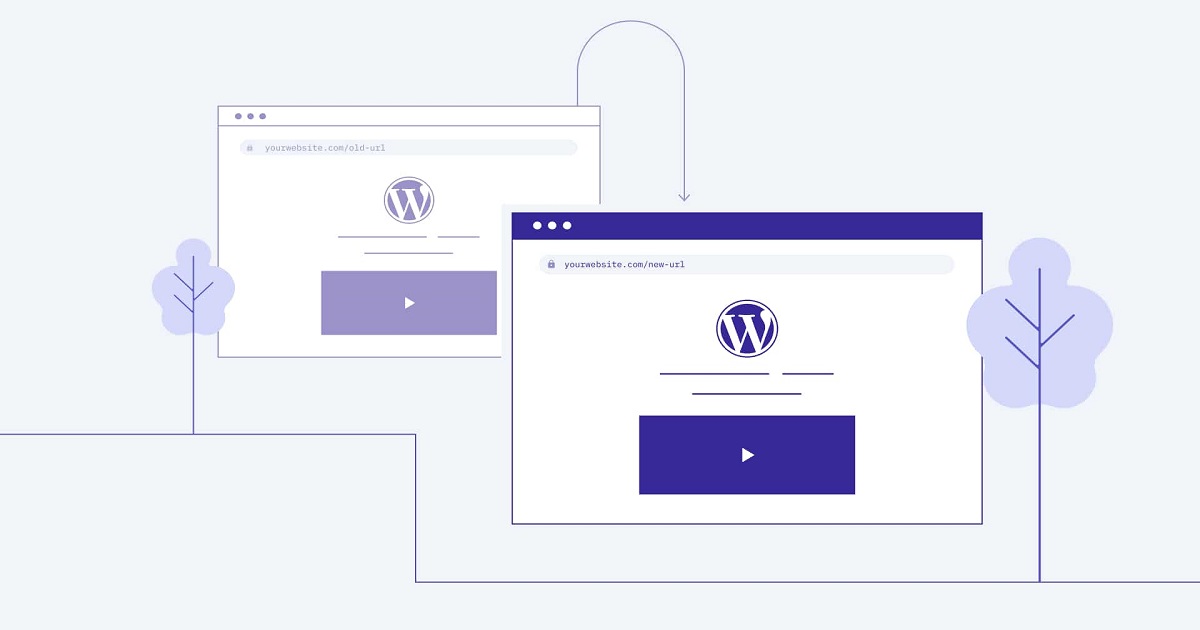
A URL redirect allows you to send visitors/bots from one URL on your website to another URL on your website.
For example, let’s say you wrote a blog post at example.com/best-plugins-2020 and now you want to change it to example.com/best-plugins-2021. With a URL redirect, you can configure it so that anyone who visits example.com/best-plugins-2020 is automatically sent to example.com/best-plugins-2021.
This helps provide a better experience for your human visitors, ensuring that they can always access the content they are looking for. For example, instead of seeing a 404 error page if they accessed the best-plugins-2020 URL, they could still access the latest content because they are automatically redirected to best-plugins-2021.
Redirects are also important for search engine optimization (SEO) as they allow you to preserve your rankings and links. For example, let’s say you have a lot of links from other sites to your Best Plugins of 2020 post (which is good for SEO). If you didn’t set up a redirect, you would lose many of the benefits of those links by changing the URL. But with a redirect, you can preserve that binding authority for the new URL.
What Can You Use URL Redirects For?
Change a piece of content’s URL: Every time you change the URL of a post or page on your WordPress site, you need to set up a redirect to avoid 404 errors and maximize SEO.
Fix broken content: If you see a lot of 404 errors at a given URL on your site, you can set up a redirect to send those visitors directly to the content they’re looking for.
Change your website’s domain name: If you change your WordPress website’s domain name (during a site migration, for example), you should always set up a redirect so that visitors from the old domain are sent to the new domain.
Going from HTTP to HTTPS: When installing an SSL TLS certificate, you must configure a redirect to ensure that all visitors use the most secure HTTPS version of your website instead of HTTP.
Force www or not www: If you prefer www.yoursite.com over yoursite.com, you can set up a redirect to force all visitors to use the www version (or vice versa).
Create pretty links: Redirects can help you create more attractive internal or external links. For example, many affiliate sites hide their links (yoursite.com/go/affiliate-offer). This tactic is based on redirects. Or link shortening services like bit.ly also operate through redirects.
Different Types of URL Redirects and When You Should Use Them
To add a little complication, there are different types of redirects, each accompanied by a numeric code. All redirects work the same way (sending traffic from one place to another), but the numeric code is used to communicate additional information about the redirect to users’ web browsers and search engines like Google:
301 Permanently Moved: This code indicates that the redirect is permanent. More specifically, the content in question is no longer at the original URL and is permanently moved to the new URL. This is the most common type of redirect and is important for SEO because it gives you the opportunity to pass the “authority” from the original URL to the new URL.
302 Found (temporary redirect): This code indicates that the redirect is temporary. In other words, the content still exists in the original URL, but users are temporarily pushed to another page. You will not use this code often; it’s only useful primarily for things like A/B testing, maintenance, or geo-targeting. You should never use 302 redirects for SEO purposes.
303 See others: It is very similar to a 302 redirect. The main difference is that it prevents users from submitting information more than once (for example, credit card details). With more technical details, it prevents the user’s browser from making another PUT request and instructs the user to use GET for subsequent requests.
Temporary 307 redirects: Also very similar to 302/303 redirects. Again, the only difference is in the technical details: a 307 redirect uses the same technique to send and retrieve information, while a 303 redirect uses two different techniques.
Permanent 308 redirect: This is similar to the 301 redirect in that it means that the content has been permanently moved. The difference is in the technical details: a 308 redirect can only use POST, while a 301 redirect can change from POST to GET.
As a WordPress user, you will almost always use 301 redirects to permanently redirect content. While the other types of redirects are still useful for developers in the niche scenarios we mentioned, most common users will only need to work with 301 redirects.
And again, for SEO purposes, you will almost always want to use 301 redirects.
How To Create a URL Redirect in WordPress Using .htaccess
If your web server uses the Apache webserver (which most WordPress servers do, excluding some popular managed providers like Kinsta or Flywheel), you can set up redirects by editing your website’s .htaccess file.
Note: some managed WordPress hosts use the Nginx web server, which does not support .htaccess files. If you can’t find the .htaccess file for your website, you may want to contact your host’s support to ask how to proceed. Some Nginx-based hosts have created their own redirection tools.
Assuming your host has .htaccess files, here’s how to do this:
Locate Your Site’s .htaccess File
To access your website’s .htaccess file, you will need to be able to connect to your website’s server via FTP or a tool like cPanel File Manager.
After doing this, you should find the .htaccess file in the root folder of your website, which is the same folder that contains the wp-admin and wp-content folders.
Some WordPress SEO plugins also offer .htaccess editors in the control panel. For example, if you are using Yoast SEO, you can go to SEO → Tools → File Editor to edit your .htaccess file.
Make a Backup of Your .htaccess File
Redirects can be tricky and one small mistake can make part or all of your site inaccessible. For this reason, it is essential that you make a backup copy of your existing .htaccess file before making any changes. You can do this by downloading it to your local computer.
That way, if something goes wrong, all you have to do is re-upload your backup and your site will be back to normal instantly.
Add Your Redirects
After downloading a backup copy of your existing .htaccess file, you are ready to add your redirects using code, which can be added near the beginning of the .htaccess file.
Make sure to replace the placeholder URLs with the actual URLs you want to use:
Redirect 301 / Previous Post https://www.yoursite.com/new-post
This code snippet redirects visitors from https://www.yoursite.com/old-post to https://www.yoursite.com/new-post.
Note that for the URL that triggers the redirect, you only need to insert the part that comes after your domain name.
How To Redirect a URL With a WordPress Plugin
If you don’t want to work directly with your website’s .htaccess file, an easier option is to use a WordPress redirect plugin. These plugins allow you to create and manage your website redirects directly from the WordPress dashboard.
There are several quality options, which we will discuss in the next section. However, in this section, we will show you how to set up a redirect using one of the most popular options – the free 301 Redirects plugin. Despite the name, the plugin can help you create other types of redirects besides 301, including 302 and 307 redirects.
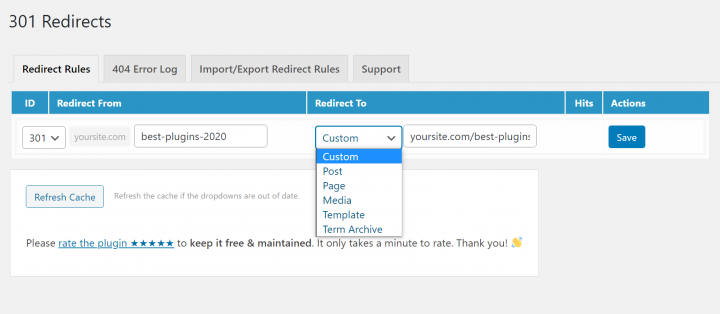
After installing and activating the plugin, you can go to Settings → 301 Redirects to start adding redirects.
Here, you will see a table with three options:
- You can use the drop-down menu to choose the type of redirect, which is 301 by default.
- In the Redirect from the field, you can enter the URL from which you want to trigger the redirect. For example, to trigger a redirect at yoursite.com/best-plugins-2020, you need to insert best-plugins-2020 in the box.
- In the Redirect to the field, you can choose where you want to send visitors. You can choose the content of your site or enter any custom URL.
After adding the information, click Save and your redirect will be active:
Get started with WordPress redirects today and improve your website
It is important to understand how to use redirects so that you can offer your human visitors a good experience and also maximize your SEO efforts.
In most situations, when creating a blog or website, you will only need to work with 301 redirects, but the other types of redirects also have their own niche use cases (although mainly for developers only).
To configure redirects, you can use your website’s .htaccess file (if your host’s web server is Apache) or one of the WordPress redirect plugins that we have detailed.
Still, do you have any questions on how to use redirects in WordPress? Leave a comment!