
No matter what type of content you are creating, your audience is worth listening to. Knowing their tastes and behaviors can help you make the necessary adjustments to retain old visitors and attract new ones. However, one of the most useful sources of this data is unlikely to appear in the comment sections, as users are interacting with your site.
Fortunately, adding Google Analytics to your WordPress site offers a solution. This free tool allows you to easily and accurately collect data on your website traffic and other metrics. With this deep understanding of your users, you can make more informed decisions to maximize your impact and cultivate a loyal fan base.
In this tutorial, I will provide an overview of what Google Analytics is and how you can use it to your advantage. After that, I will show you step by step how to seamlessly integrate this solution into your WordPress site. Let’s start!
What Is Google Analytics
If you’ve spent any time on the internet, you can bet you know Google. Although primarily known for its extremely popular search engine, this industry behemoth also offers a wide variety of other internet-based services.
Google Analytics is a particularly useful tool for WordPress users.
This platform not only monitors your website traffic on all of your pages but also generates detailed user reports on a wide variety of metrics. You can collect information such as:
- The most common languages and geographic locations of visitors.
- Bounce rate for each page
- Which web browser is the most popular among users?
- Which pages do visitors see most often and for how long?
Simply put, Google Analytics collects almost all the information it needs to create an accurate picture of how users interact with your site.
This data is then presented to you in an organized way in the form of customizable charts and graphs. Given the vast amount of accessible knowledge that Google Analytics offers, it is not surprising that it is the most widely used traffic measurement service on the web.
How to Add Google Analytics to Your WordPress Site (In 4 Steps)
Best of all, it only takes four simple steps to start collecting a wealth of useful data about your site. Let’s go over the process of connecting Google Analytics to your WordPress site, one step at a time.
Step 1: Sign Up for Google Analytics
The first thing to do is create a free Google account if you don’t already have one. Your analytics will be linked to this account, so you may want to consider making a separate one specifically for your site.
Once you’ve done that, go to the Google Analytics homepage and click Set up for free.

This will take you to the account settings page, where you can fill in the relevant fields with basic information about your site. You will then have the option to change the default data sharing settings. Google labels all of this as “recommended”, and I usually agree.
However, if you want to disable them, be sure to read the included fine print to understand how the decision could affect your use of Google Analytics.

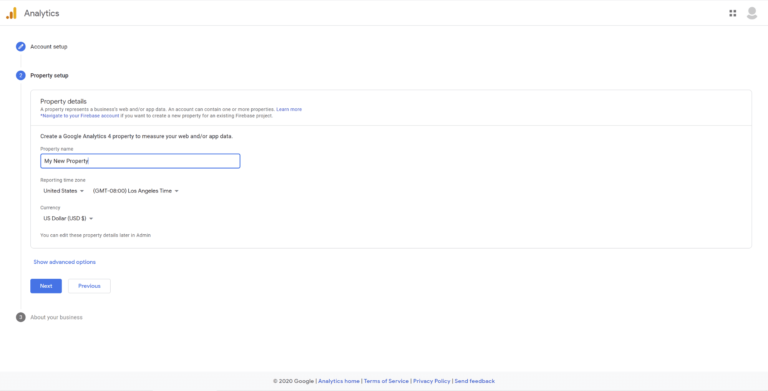
Then it is time to name your property. Because an account can have multiple properties, it is a good idea to name it so that it clearly reflects the site you want to review. This is especially important if you are likely to want to monitor more properties in the future.
After that, you can adjust the time zone and currency according to your website location.
Then select the Create a Universal Property option, enter your site URL when prompted, and choose to Create a Universal Analytics Property just before continuing.
You can complete this step by indicating the industry, size, and intended use of Google Analytics for your site.
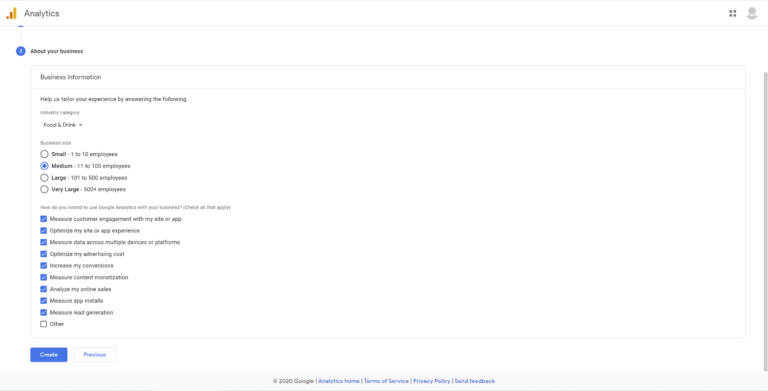
Once you click Create, your account registration with Google Analytics will be completed and you can proceed to the next step.
Step 2: Select a Google Analytics Plugin
You can use Google Analytics simply by accessing the platform, connecting to your website manually, and using the provided dashboard. However, it is a good idea to connect the service directly to your WordPress site. This makes it much easier to visualize your metrics and is easy to accomplish using a plugin.
When it comes to finding the right Google Analytics plugin, there are numerous quality options at your disposal. Before making a decision, you should consider what benefits you expect to derive from your analytics platform and select a plug-in with features that serve that purpose.
For example, some solutions, such as 10WebAnalytics, excel at presenting additional personalized statistics, which can be useful if you want to focus on a specific aspect of your website traffic. Others, like Analytify, focus more on quick and easy data evaluation right from your dashboard, which can be a good option if you prefer a more comprehensive approach.
The main thing to avoid during this step is choosing a poorly optimized plugin. Since clunky scripts and conflicting plugins can slow down your web pages, you probably want to avoid them at all costs. Fortunately, you don’t need to learn to code to fix this problem. You can rely on user reviews and ratings to rate popular options and check their update histories to make sure the developers are still active.
For the purpose of this tutorial, I chose the Google Site Kit plugin.
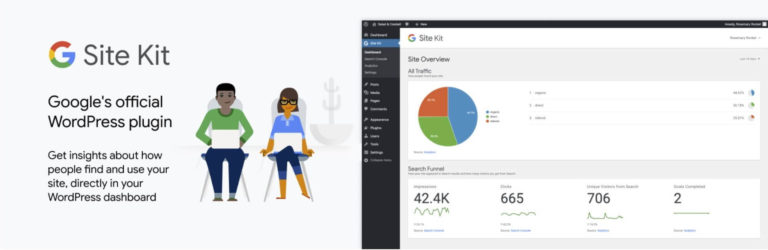
As the official WordPress plugin for Google Analytics, Site Kit offers a perfect way to monitor your website performance. It also includes helpful features like PageSpeed Insights, which compares each page’s stats to other sites and provides guidance to help you grow your numbers.
As a bonus, there is no cost associated with this plugin. It allows you to easily access Google Analytics from your WordPress dashboard for free.
Step 3: Integrate Google Analytics with Your Website
To get started using the Site Kit plugin, install and activate it on your WordPress site. Once activated, you will see a message to start configuring the plugin.
Click Start setup, select Sign in with Google, and follow the instructions on the screen.

After granting the requested permissions, you will see a success screen. Click Go to my dashboard to return to your WordPress dashboard.

You will see a new temporary section at the top of the page, containing an Analytics box. Click on the Connect Service link below it, which will take you to the Google Analytics setup screen.
You will need to log into your Google account once more and allow Site Kit to access your data. Select the appropriate analytics information from the drop-down options, making sure to verify your selections if you are using Google Analytics on more than one website.
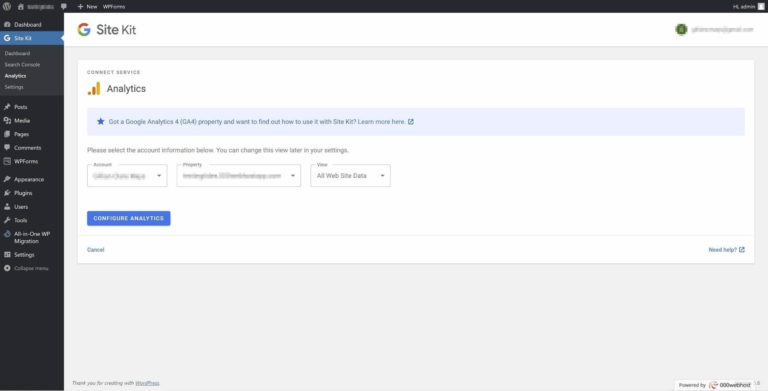
Then, click on Configure Analytics to complete the process and link your accounts.
Step 4: Start Analyzing Your Website’s Data
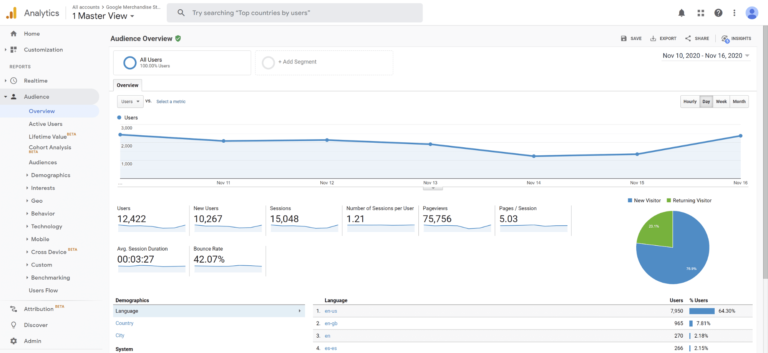
After completing the three steps above, Google Analytics will start logging data from your WordPress site.
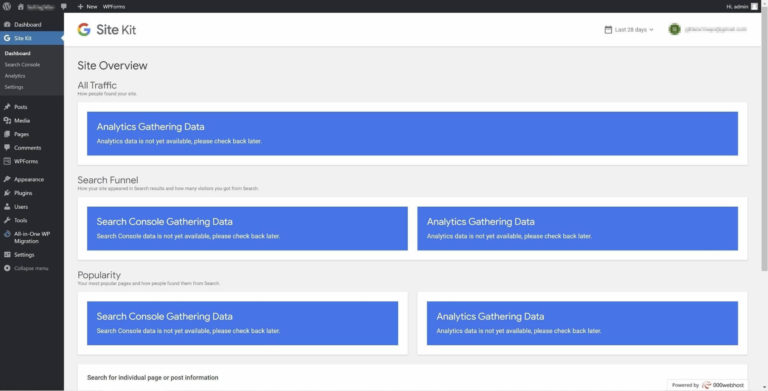
If your overview report is completely empty like in the screenshot above, don’t panic! There will be no data for the plugin to display yet, so you will have to wait up to 24 hours for it to start collecting information.
Once the results start to appear, you will have access to the information you need to improve your site traffic in a number of ways.
If you don’t know where to start, check out where the majority of your visitors are coming from in the world and consider how you can further optimize your content for those markets.
You can also see how many of your users visit from mobile sites, as opposed to desktop versions, and use that information to decide a theme that will optimize your site for the most visitors.
There are many metrics available, so there will likely be some trial and error as you learn to make better use of all your new knowledge. So don’t be afraid to get creative in problem-solving.
Just be sure to track your results as your content evolves to see how valuable your changes are, and you’ll be on your way to making informed decisions to maximize your site traffic.
Conclusion
Understanding the behavior of your audience can be critical to the success of your site. Fortunately, you can count on Google Analytics to provide a wealth of actionable data on who visits your site, how long they stay on your site, and much more.
What analytics have you found most helpful in driving traffic to your site? Let us know in the comment section!